Wednesday, April 3, 2013

Stamp Your Way Into Her Heart

Are you a mom? Do you have a mom? Do you know a mom? Then you might have started thinking about Mother's Day. It's a little ways off still (May 12), but I've started brainstorming about what kind of mother's jewelry I want to make.

I made a "Secret Message" ring, that can have almost countless variations.


As you can see, the outside is very simple. It could be a plain band, or an initial, or any of 100's of design stamps that are available, and the inside has the secret message; which could also be anything that fits on the ring.

I made some of these rings for a boutique I am going to be at, so I made them in a one-size-fits-all cuff style. It could just as easily be made into a full ring though.

I also came up with this mother's necklace. Another simple piece (I'm kind of leaning towards more minimalistic styles lately. Just cuz.) that allows for 1,2,3, or 4 birthstone beads.


This one could also be easily customized. It could have a heart instead of the word "mom," or a name, or whatever. The beads could also just be decorative instead of birthstones. I just had a thought... A star with a red, a white, and a blue bead. Patriotic, right?

Endless possibilities! That's what I love so much about making jewelry. Especially when it's hand stamped, because it can have personalized meaning. I recently became a distributor of ImpressArt Metal Stamps. They have such a huge variety of design stamps, and alphabet fonts - I'm really having fun with them! You can check out some of the stamps here if you're interested. (I've just set this up, so I'll be adding lots more in the coming weeks!) Even if you've never done any stamping, jewelry like this ring and necklace are so easy and fun to make! Think of the fun you'll have whipping out Mother's Day gifts, birthday gifts, YOU gifts! :)

Mother's Day is in just over a month. Better get started!

Alisa


Friday, March 22, 2013

Friday Finds

Are you an April Fooler or an April Foolee? Well, it's coming up soon, and you'd better get prepared if you want to fool more than you want to be fooled! I found an imaginative list of pranks here if you'd like to peruse through them to get your prank juice flowing.

I also found some fun ideas from the handmade arena. This one made me smile... A Boyfriend in a Bottle at Sparkly Pony on Etsy. Hmmmm, not a bad idea.


And a baby with a mustache! This baby is cute no matter what it has on its face. :) You can find your mustache at Wee Hilarity.


For this, I have only one word. Gross. But, gross and April Fool's Day go hand in hand, right? Find these matchboxes and other fun gag gifts at Dippy Lulu.


And of course, I found a plethora of fake spills; from baby bottles and melted ice cream to fingernail polish and paint. I even found a vial of fake spilled blood. I chose the picture of spilled Diet Coke, because that would be totally believable anywhere in my vicinity. You can find all this and more at Fake Food Decor.


Do you have any favorite April Fool's Day pranks? Comment and let us know!


Alisa

Friday, February 22, 2013

Beautiful Bullets

This is not a political blog. But there are some things I just have an opinion on, and this opinion happens to lend itself well to jewelry. :)

Gun control. This idea scares me. Even if you don't own a gun, and have no desire to ever own a gun, and even if you're afraid of guns; this idea should scare you. Self defense, hunting, and target shooting aside, this is a human right we are talking about - a right specifically outlined in the constitution! Allowing the government to take away any of our rights is so out of our American Character, that I find it appalling that it's even being considered. The governmental snowball is rolling, and if we don't stop it, it will become an avalanche. 

I watched a video recently where a man was talking about Congressman Giffords being shot at a supermarket during a rally. He said that nearby people stopped the attack using a ball point pen when the shooter stopped to reload. I am proud of them for stepping up and using whatever means necessary to protect themselves, their leaders, and their friends and neighbors. But... If I'm ever in a situation where I, my family, my home, or other innocent people are being threatened, I don't want to stand there and wait until the shooter has emptied his gun, while I hope no one gets hurt. And I'd prefer to have a gun over a ball point pen. And if others would prefer to stand there and hope they don't die, then that's just fine, but don't take my right to protect me and mine away. 

I don't carry a gun, actually, but my husband does. He has hunted all of his life, and he knows how to safely handle a gun to protect himself and others from accidental harm. That's key, I think. I'm scared to see the general public waving guns around willy-nilly! My husband recently bought a new gun, and some of the other customers buying guns obviously had no idea how to use one. Maybe people should have to take a gun safety class when they buy their first gun, I don't think that's unreasonable. 

Anyway, that went on much longer than I thought it would! You're probably wondering how this has anything to jewelry...


I think these are awesome! You can find them in an Etsy shop called Trash and Trinkets. She has recycled, upcycled, repurposed and uppurposed (if that's not a word now, it soon will be) used shell casings from different sized bullets. She uses silver, brass, and copper embellishments and lots of different colored stones or crystals to make each one unique.

I had to try to make one myself! I looked online for some pretty embellishments... for about 10 minutes, then I got too impatient and just made one with things I had on hand. :) Mine is not as pretty as hers, but it satisfied my itch to make one, and I kind of like it. I want to be clear, though, that I won't sell these; it's obviously not my design. But I'm happy to send you to Trash and Trinkets to buy one of your own!


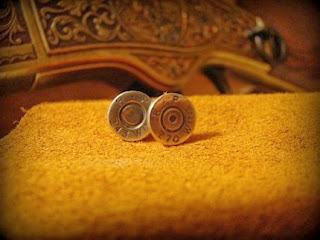
I do have a bullet tie tack that I'll sell you though! It's a nice statement piece. I can make you one out of a mold I already have, or I can make one for you with your bullet of choice if you'd like to send it to me.


In the second picture, the tie tack on the left is made from a bullet that hasn't been shot, and the tie tack on the right is made from the shell of a used bullet. It's kind of cool to make one from a significant shell of your own (from a successful hunt, bulls-eye shot from a tournament, etc). Feel free to contact me if you'd like to discuss the possibilities!

Friday, May 11, 2012

Friday Finds

I have been looking into the world of Etsy's edible goodness.... And I'm getting hungry! I, myself, enjoy being in the kitchen only to eat, and for no other reason, so I am very impressed with these talented and creative culinary artists.

Look at these candies! Yes, candies... They look like real seashells, don't they? Jason and Andie at Andie's Specialty Sweets make these candy coated chocolates, and many other incredibly beautiful candies for your enjoyment. 

Here's something different... Maple Bacon Cake Bites... Cake mixed with maple icing and pieces of bacon, dipped in chocolate and topped with more bacon. Oh my goodness, sweet and salty at its best! You can find these at Bite Sized Delights by Ann on Etsy.

Classic. Strawberry Rhubarb Jam. My mom used to make this stuff, and it's my "berry" favorite! My mouth is seriously watering looking at this picture. Get it at Copper Pot Traditions.

And, oh my. Organic Vanilla Bean French Macarons. Not to be confused with macaroons... Do I need to even say anything about these? Just look at that cookie. If the sight of it alone doesn't sell you on it, there's nothing more I can say that will. Mmmmm. Andrea has these and more at Salt City Bakery.


Alisa

Saturday, May 5, 2012

Hollow Book Nook/Kindle Case

I keep seeing these online, and I've been wanting to make one forever. I'm so excited to finally have one done! It took some thought and planning beforehand, and since I usually tend to tear into things without much thought and planning beforehand, I thought I'd better document the process in case I want to make another one.


The choosing of a book actually took me a while. I started out wanting to use an old classic book... Something that would make me look cultured and intelligent if I carried it around. :) But finding one that was big enough without being too bulky was a challenge, not to mention the fact that I would probably have a hard time "destroying" a classic when it came right down to it. I finally found this blank journal, and I think it's perfect! It's nice looking, has a ribbon marker, and best of all, it has a magnetic flap closure. I found it at The Vickerey.


Ok, let's get started! In addition to your book of choice, you'll need Elmer's Glue All (or something similar), a small bowl, a paintbrush, an exacto knife, coarse sand paper, a stapler, and clear elastic. I had a hard time finding clear elastic (in the one and only store I looked in - I hate shopping!) so I bought a pair of removable clear bra straps. Worked perfectly! You'll also need to have something heavy on hand to weigh the book down as the glue dries. And, of course a Nook or Kindle for sizing purposes.


1. If your book has a ribbon marker, cut it out, but leave the top inch or so to make it look like it's still in place as it should be. We'll get back to the ribbon later.


2. Glue together the first 1/4 or so of the pages*; just lightly to hold them together before you start hollowing out the book. It probably won't hold for the whole process, and that's ok. You'll apply more glue later. It's important to thin the glue with water so it seeps into the pages better, and isn't visible when it's dry. Put a bit of glue and water in the small bowl, and use the paintbrush to apply it to the outer edges of the pages. Be so careful not to glue the cover down! It's better to leave the first few pages unglued for now than to accidentally glue down the cover.

*The reason I only did the first quarter is because I wanted to insert the ribbon marker and clear elastic later. Therefore, I couldn't glue all the pages just yet. If you just want a hollow book without the ribbon and elastic, go ahead and glue all the pages, EXCEPT for the last 4 or 5, or however many pages you want to leave as the bottom of the "box" when you're done.


3. Place something heavy on top of the book and let the glue dry. I placed a notepad between the book and the cans to even out the weight and to protect the book from any marring.


4. After the glue is dry, use your e-reader to trace the hole you will be cutting out. Make sure that it's centered and straight, then use a straight edge and the exacto knife, and start cutting. 

*Tip - it's better to cut it just the smallest smidge too big than it is to shave off a millimeter or so afterwards because it's too small. Trust me on this! You still want a close fit though, to keep your e-reader safe.


The cutting process is a long one, but please take your time. Just gently cut through a couple of pages at a time. If you find yourself pushing too hard on the knife, back off, because one slip.... and it's off to the hospital for stitches; or even worse, you  may cut where you don't want to cut and have a crummy looking hollow book when you're done. :)


5. When you're done cutting through the first quarter of the book, it's time to glue together the rest of the pages.* Well, most of them, anyway. Leave out 4 or 5 pages in between, and 4 or 5 pages at the end. This is just a buffer to make sure the glue doesn't seep too much and glue all of them together yet. (In the above picture the book is upside down, so the cut out portion is actually at the front of the book... I don't know why it's upside down, it just is.) Glue the back section of pages together, weighing them down as they dry, just as you did the front section.

*Again, if you're not including the ribbon or elastic, you will omit this step, as your book will already be glued together.


6. After the glue is dry, put a piece of cardboard just before the pages at the back that will be the bottom of the box, so they don't get cut. Continue to hollow out the book.


8. When you're all done hollowing, the edges where you have cut will be rough. Carefully sand them with coarse sand paper to smooth them down.* It won't be perfect, but it will have a much more finished look.

*Hold the pages together as tightly as you can to prevent damaging them as you sand. The pages, which were glued lightly, will probably be coming apart a bit, and the edge you will be sanding hasn't been glued at all. Remember, it doesn't have to look perfect, just sand off the roughness.


9. Now it's time to add the ribbon and the elastic. Lift the first quarter of the book (that you originally glued together) and place the ribbon and elastic as pictured above. Staple them in place by opening the stapler so you can staple right into the pages beneath... Just like you would staple something to a bulletin board. As long as at least one side of the staples catch the ribbon and elastic, it should be fine. Sorry, no picture to show you, I hope my explanation makes sense!

*The elastic, of course, is to help keep your e-reader securely in place, and the ribbon is meant to go under it to help lift it out when you need it.


10. Glue the back cover and back pages to each other and to the hollowed out pages using regular glue (sparingly) not the diluted glue, to help avoid wrinkles in the bottom. Glue all the edges around the outside of the book, and the inside edges of the hollowed out portion, using a thin layer of the glue/water mixture. Apply the glue in several coats, weighing down the book and letting it dry in between, until you feel confident that it will hold solidly.


And there you go!


Alisa


Thursday, April 26, 2012

Autism Awareness

Do you know anyone with autism? Chances are you do. The Autism Society states, "In December 2009, the Centers for Disease Control and Prevention issued (a report concluding) that the prevalence of autism had risen to 1 in every 110 births in the United States, and almost 1 in 70 boys."

Autism is treatable. It's not something people "grow out of," but if it's detected early, a lot can be done to improve the lives of those affected and their families.

April is Autism Awareness month, and as the month comes to a close I want to draw your attention, again, to the autism awareness bracelets that I have in my shop. $5 from each purchase is donated to the Autism Society. That's true all the time, not just during the month of April.

Autism Awareness Bracelet

Alisa

Thursday, February 9, 2012

Friday Finds... A Thursday Version

Ahhh, love!

As you browse through today's Finds, please enjoy the #1 love song of all time, according to About.com... The Beatles - Something. :)


There's nothing like good sugar cookies... And they're nothing like my sugar cookies, so these look super tempting to me! Sugar and Flour has them for every occasion, and she's happy to take custom orders! Mmmmm....


I love this fun, handmade scarf; to wear on that Valentine's Day date, or any other time you want to look trendy and super cute! Fairstore has this and lots of other great crocheted items to choose from.


Ha, ha... I love it! These Hill-Billy approved goblets made me laugh, and I think everyone should have a complete set! You can find them at A Wine Twist, on Etsy.


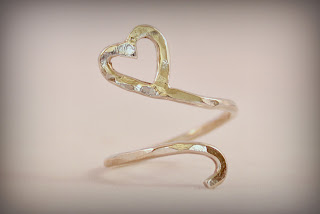
And last, and probably least, check out my new Sterling Heart Ring. :)


Happy Valentine's Day!

Alisa